
 I’m a big fan of RideWithGPS. I have been using it for many years to develop routes and download them to my Garmin devices. A few years ago they came out with an app for your smartphone and with a few caveats, it is probably the best tool to use for navigation while on your bike.
The RideWithGPS app is great for several reasons:
- The screen is bigger and clearer than any current Garmin.
- The visual prompts for turns are very clear.
- The touch interface on a phone is much more responsive and natural to use than the Garmin.
- The app will give you verbal cues if you want, and you can configure what you want to hear to cut down on the verbal chatter.
- The app handles rerouting when you get lost much better than the Garmin.
- You can download the routes and maps before your ride so that you don’t have to use any data to navigate. You can actually have your phone in Airplane mode and still navigate.
- If you and your co-riders all enable it, the app can show you where everyone you are riding with is (this does use data and requires cell service).
Any tool you use has its quirks. Some are more frustrating than others. In my “Getting the most out of your Garmin” newsletter, I outlined some of the issues with Garmin devices. Here are some of the issues with using the RideWithGPS app:
- It uses a fair amount of battery power on your phone. If you keep your screen off, you can probably get away with doing a medium long ride navigating with the app, but if you want to be able to see the map at all times, you won’t be able to unless you have an external power source. However, you can get a good external battery for your phone for $20-$30 to get around this.
- Your phone is probably not waterproof, so if you are riding in the rain, you will have to figure out something for this. They make various rain resistant cases or you can always resort to a zip lock bag, but have a plan for rain if you are using your phone for on bike navigation. Note that the iPhone 7 and later models are waterproof. If you have an Android phone, look up the specs for your particular model.
- You need a good phone mount for your bike. There are lots of different ones out there to meet practically every need/desire. Just make sure it’s really secure and consider having some sort of string/rubber band or something as a backup just in case the mount fails.
- If you use a heart rate monitor with your Garmin, you will need to get a compatible heart rate monitor strap that has Bluetooth capabilities.
- The RideWithGPS app is free, but you must have an account with them in order to use it*. They have a free account, but if you want to use the app to navigate a route, one of the following has to be true:
- You have a paid RideWithGPS account. The plans start at $50/year. Or…
- You are using a route from a club or tour operator’s paid account. Adventures In Tandem has a special account with RideWithGPS, and if you use one of our routes, you will be able to navigate, even with the free account.
To me, the waterproofing issue is one of the biggest if you have a non waterproof phone. You can get waterproof cases, but if you try to keep the phone plugged in to your spare battery, that usually opens a spot in the case that will let water in. Here’s where being on a tandem can really help. The main navigator uses a smartphone, and the other uses a Garmin, which also acts as a backup in case of rain.
How to use the app
You can look at the RideWithGPS documentation for their mobile app, so I am not going to repeat all of that info here. But here are some important things you should know:
- Rides can be grouped into a RideWithGPS Event, and you can be invited to join the event via an email. Once you accept the event, you will be able to work with its routes on your phone. Events that you are a member of will be listed on the home page of the app. You may have to scroll down a bit.
- If you want to navigate without using your phone data, once in the event, you can touch the three dot menu on the top right, and touch “Download All”. This will download all of the routes and the underlying maps needed for them to your phone. Downloading all of this may take a while and you should probably be on a wi-fi connection when you do it.
- To ride a route, touch on the route, then touch the three dot menu on the top right and select “Navigate”.
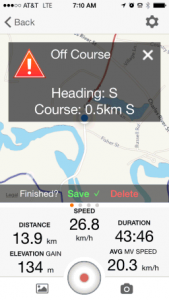
- When navigating a route, the app will show you a set of 5 data fields on the bottom of your screen. You can change the value in any of these fields by touching and holding on the field. A list of available data points will come up, and you can choose what you want displayed there. I like to display “Distance to cue” as one of the fields so that I know how far it is to the next turn. You can swipe right and left to show more fields, an elevation graph and the cue list.
- When you are done with a ride, hold the Pause button for a few seconds and then click Save to save the ride or Delete if you don’t want to save it.
One cool feature of the app is “group live logging”. This will enable you to see where all of your fellow riders are (if they are also navigating with the app).
- After you click on “Ride This”, you will see an antenna icon on the top right of the screen. Click on this icon and then click “Done” or “OK” on the popup.
- Updates are only sent once every 5 minutes by default, so this doesn’t use much battery power.
- Details on live logging options and what they mean can be seen here.
Here are some other things that you should know about the app:
- While riding a route, if you like to have the map oriented so that the direction you are traveling in is always up, you can click on the three dots on the top right and turn on “Auto-Rotate Map”.
- If you are using an external battery and want to keep the screen on, you will also find the “Keep Screen On” option in this same menu.
- While riding a route, you can control the volume of the voice cues If you click on the speaker icon on the top of the screen.
- On the bottom of the navigation page, you can “pull up” the info section and then swipe left and right to see even more information, including the full cue sheet.
- You can control which voice navigation prompts you want to hear by clicking on the three bar menu (top right), then Navigation Settings.
- Even if you are not navigating with the phone app, you can open a route and click on the three dots on the top right and click “Show My Location”. This is great when you are lost and you want to see your location relative to the route – so you can figure out how to get back.
For something a bit different, you can also try Sheldon Brown’s RidewithoutGPS.
* With the new RideWithGPS Experiences feature, you don’t even need an account. A tour operator, like us, would have to set this up for your tour to take advantage of it.